In this post I will show you how to provide multitenancy in a Spring Boot application using Postgres Row Level Security Feature.
All code can be found in a Git repository at:
Table of contents
What Is Multitenancy?
As soon as your application has multiple customers you will need to implement some kind of multitenancy for your application.
Microsoft writes on multitenant applications:
A multitenant application is a shared resource that allows separate users, or "tenants," to view the application as though it was their own. A typical scenario that lends itself to a multitenant application is one in which all users of the application may wish to customize the user experience but otherwise have the same basic business requirements.
The best introduction to multitenant applications I have found is written by Microsoft at:
Multitenant Models
There are several models to achieve multitenancy in an application:
- Database per Tenant
- Each Tenant has its own database and is isolated from other tenants.
- Shared database, Separate Schema
- All Tenants share a database, but have their own database schemas and their own tables.
- Shared Database, Shared Schema
- All Tenants share a database and tables. Every table has a Column with the Tenant Identifier, that shows the owner of the row.
Think about it like this (taken from StackExchange Software Engineering):
- Database per Tenant: Every Tenant has its own house.
- Shared Database, Separate Schema: Every Tenant in the same building, but has its own apartment.
- Shared Database, Shared Schema: Everyone is living in the same apartment and all stuff is marked with sticky-notes to show who owns it.
Every model is a trade-off between isolation and resource sharing, which is explained in detail at:
In a previous post I have shown how to implement a Database per Tenant approach, in this post we will see how to provide Multitenancy in a Shared Database, Shared Schema.
Spring Boot Example Application: Managing Customers
In this example we are going to develop a multitenant application to manage customers. At the same time we will also dockerize the whole application and learn more about Spring Boot.
Creating the PostgreSQL Database
The idea is to have two scripts create_database.sql for creating all relevant database
objects, such as users, tables and indices, and another create_data.sql script for
creating sample data.
create_database.sql
We start by creating a file create_database.sql and create two users for the tenant_a and tenant_b:
---------------------------
-- Create the tenants   --
---------------------------
IF NOT EXISTS (
  SELECT FROM pg_catalog.pg_roles
  WHERE  rolname = 'tenant_a') THEN

    CREATE ROLE tenant_a LOGIN PASSWORD 'tenant_a';

END IF;

IF NOT EXISTS (
  SELECT FROM pg_catalog.pg_roles
  WHERE  rolname = 'tenant_b') THEN

    CREATE ROLE tenant_b LOGIN PASSWORD 'tenant_b';

END IF;
Next we create the multitenant schema, where all our database objects will go:
---------------------------
-- Create the Schema     --
---------------------------
CREATE SCHEMA IF NOT EXISTS multitenant;
Then we create Sequences for all tables needing an auto-incrementing key:
----------------------------
-- Create Sequences       --
----------------------------
CREATE SEQUENCE IF NOT EXISTS multitenant.customer_seq
    start 38187
    increment 1
    NO MAXVALUE
    CACHE 1;

CREATE SEQUENCE IF NOT EXISTS multitenant.address_seq
    start 38187
    increment 1
    NO MAXVALUE
    CACHE 1;
Then we are create the tables for the application:
----------------------------
-- Create the Tables      --
----------------------------
CREATE TABLE IF NOT EXISTS multitenant.customer
(
    customer_id integer default nextval('multitenant.customer_seq'),
    first_name VARCHAR(255) NOT NULL,
    last_name VARCHAR(255) NOT NULL,
    tenant_name VARCHAR(255) NOT NULL,
    CONSTRAINT customer_pkey
        PRIMARY KEY (customer_id)

);

CREATE TABLE IF NOT EXISTS multitenant.address
(
    address_id integer default nextval('multitenant.address_seq'),
    name VARCHAR(255) NOT NULL,
    street VARCHAR(255) NULL,
    postalcode VARCHAR(255) NULL,
    city VARCHAR(255) NULL,
    country VARCHAR(255) NULL,
    tenant_name VARCHAR(255) NOT NULL,
    CONSTRAINT address_pkey
        PRIMARY KEY (address_id)

);

CREATE TABLE IF NOT EXISTS multitenant.customer_address
(
    customer_id integer NOT NULL,
    address_id integer NOT NULL,
    tenant_name VARCHAR(255) NOT NULL,
    CONSTRAINT fk_customer_address_customer
        FOREIGN KEY(customer_id)
        REFERENCES multitenant.customer(customer_id),
    CONSTRAINT fk_customer_address_address
        FOREIGN KEY(address_id)
        REFERENCES multitenant.address(address_id)
);
And enable Row Level Security for all tables:
---------------------------
-- Enable RLS            --
---------------------------
ALTER TABLE multitenant.customer
    ENABLE ROW LEVEL SECURITY;

ALTER TABLE multitenant.address
    ENABLE ROW LEVEL SECURITY;

ALTER TABLE multitenant.customer_address
    ENABLE ROW LEVEL SECURITY;
The RLS Policy is, that a Tenant only has access to their own data. The Tenant name in the example equals the currently connected user:
---------------------------
-- Create the RLS Policy --
---------------------------
DROP POLICY IF EXISTS tenant_customer_isolation_policy ON multitenant.customer;
DROP POLICY IF EXISTS tenant_address_isolation_policy ON multitenant.address;
DROP POLICY IF EXISTS tenant_customer_address_isolation_policy ON multitenant.customer_address;

CREATE POLICY tenant_customer_isolation_policy ON multitenant.customer
    USING (tenant_name = current_user);

CREATE POLICY tenant_address_isolation_policy ON multitenant.address
    USING (tenant_name = current_user);

CREATE POLICY tenant_customer_address_isolation_policy ON multitenant.customer_address
    USING (tenant_name = current_user);
Finally we need to grant both Tenants access to the database objects:
--------------------------------
-- Grant Access to the Schema --
--------------------------------
GRANT USAGE ON SCHEMA multitenant TO tenant_a;
GRANT USAGE ON SCHEMA multitenant TO tenant_b;

-------------------------------------------------------
-- Grant Access to multitenant.customer for Tenant A --
-------------------------------------------------------
GRANT ALL ON SEQUENCE multitenant.customer_seq TO tenant_a;
GRANT SELECT, UPDATE, INSERT, DELETE ON TABLE multitenant.customer TO tenant_a;

GRANT ALL ON SEQUENCE multitenant.address_seq TO tenant_a;
GRANT SELECT, UPDATE, INSERT, DELETE ON TABLE multitenant.address TO tenant_a;

GRANT SELECT, UPDATE, INSERT, DELETE ON TABLE multitenant.customer_address TO tenant_a;

-------------------------------------------------------
-- Grant Access to multitenant.customer for Tenant B --
-------------------------------------------------------
GRANT ALL ON SEQUENCE multitenant.customer_seq TO tenant_b;
GRANT SELECT, UPDATE, INSERT, DELETE ON TABLE multitenant.customer TO tenant_b;

GRANT ALL ON SEQUENCE multitenant.address_seq TO tenant_b;
GRANT SELECT, UPDATE, INSERT, DELETE ON TABLE multitenant.address TO tenant_b;

GRANT SELECT, UPDATE, INSERT, DELETE ON TABLE multitenant.customer_address TO tenant_b;
create_data.sql
In the create_data.sql file we are going to add two customers. The customer
"Philipp Wagner" is owned by Tenant A. The customer "John Wick" is owned by
Tenant B.
DO $$
BEGIN

----------------------------------------------
-- Create the Sample Data for Tenant A      --
----------------------------------------------
INSERT INTO multitenant.customer(customer_id, first_name, last_name, tenant_name)
    VALUES
        (1, 'Philipp', 'Wagner', 'tenant_a')
    ON CONFLICT DO NOTHING;

INSERT INTO multitenant.address(address_id, name, street, postalcode, city, country, tenant_name)
    VALUES
        (1, 'Philipp Wagner', 'Fakestreet 1', '12345', 'Faketown', 'Germany', 'tenant_a')
    ON CONFLICT DO NOTHING;

INSERT INTO multitenant.customer_address(customer_id, address_id, tenant_name)
    VALUES
        (1, 1, 'tenant_a')
    ON CONFLICT DO NOTHING;

----------------------------------------------
-- Create the Sample Data for Tenant B      --
----------------------------------------------
INSERT INTO multitenant.customer(customer_id, first_name, last_name, tenant_name)
    VALUES
        (2, 'John', 'Wick', 'tenant_b')
    ON CONFLICT DO NOTHING;

INSERT INTO multitenant.address(address_id, name, street, postalcode, city, country, tenant_name)
    VALUES
        (2, 'John Wick', 'Fakestreet 55', '00000', 'Fakecity', 'USA', 'tenant_b')
    ON CONFLICT DO NOTHING;

INSERT INTO multitenant.customer_address(customer_id, address_id, tenant_name)
    VALUES
        (2, 2, 'tenant_b')
    ON CONFLICT DO NOTHING;

END;
$$;
Adding a Docker Compose
We are adding a docker-compose.yml and use the official PostgreSQL 16 image to spin up a PostgreSQL instance. Our
sql scripts are mounted to /docker-entrypoint-initdb.d/, so they are executed when the database is initialized.
networks:
  services:

services:
  postgres:
    image: postgres:16
    container_name: postgres
    networks:
      - services
    ports:
      - "5432:5432"
    environment:
      - POSTGRES_USER=postgres
      - POSTGRES_PASSWORD=password
      - POSTGRES_DB=sampledb
    volumes:
      - ./sql/create_database.sql:/docker-entrypoint-initdb.d/1-create_database.sql
      - ./sql/create_data.sql:/docker-entrypoint-initdb.d/2-create_data.sql
    healthcheck:
      test: [ "CMD-SHELL", "pg_isready -U postgres" ]
      interval: 5s
      timeout: 5s
      retries: 5
    profiles:  ["postgres", "dev"]
You can now easily spin up the sampledb database by running:
docker compose --profile dev up
Spring Boot Application
Project Structure
It's useful to take a look at the Project structure first:
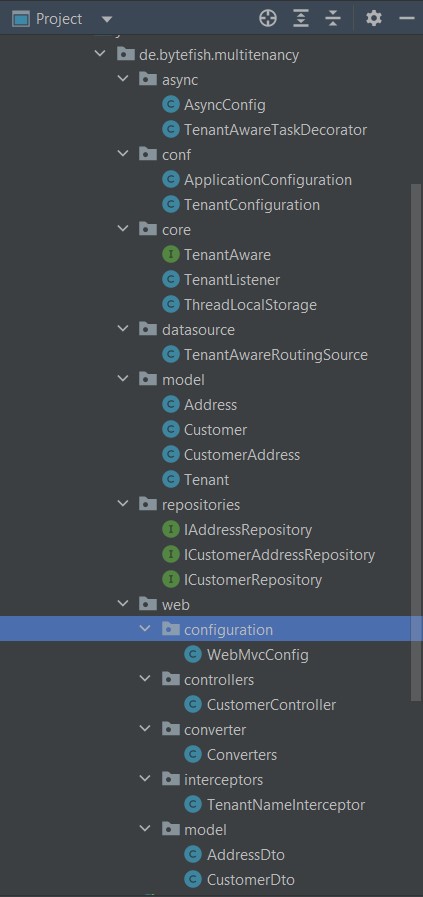
The purpose of the various classes:
asyncAsyncConfig- Provides a TaskExecutor decorated for TenantAware Processing.
TenantAwareTaskDecorator- Adds a Spring Boot
TaskDecorator, that passes the TenantName to a Child Thread.
- Adds a Spring Boot
confApplicationConfiguration- The Application Configuration with all relevant configurations, which includes the Tenants.
TenantConfiguration- The Tenant Configuration with the DataSource Configuration for each Tenant.
coreTenantListener- A listener to set the Tenant on Insert, Update and Delete.
ThreadLocalStorage- Stores the Tenant Identifier in a
ThreadLocal.
- Stores the Tenant Identifier in a
datasourceTenantAwareRoutingSource- Routes to the Tenants DataSource using the tenant name as routing key.
modelCustomer- The
Customerentity, which will be managed in each Tenant database.
- The
repositoriesICustomerRepository- A JPA CRUD Repository to persist customers.
webconfigurationWebMvcConfig- Configures the Spring MVC interceptor for extracting the Tenant name from the
X-TenantIDheader.
- Configures the Spring MVC interceptor for extracting the Tenant name from the
controllersCustomerController- Implements a REST Webservice for persisting and deleting Customers.
converterConverters- Converts between the Domain Model and the Data Transfer Object.
interceptorsTenantNameInterceptor- Extracts the Tenant Identifier from an incoming request.
model- The Data Transfer Objects (DTO) for the RESTful API endpoints
Passing the Tenant Identifier through the Application
There are many ways to pass the Tenant identifier through the application. I've decided to use a ThreadLocal to do it
and wrap it in a class I've named ThreadLocalStorage.
// Licensed under the MIT license. See LICENSE file in the project root for full license information.

package de.bytefish.multitenancy.core;

public class ThreadLocalStorage {

    private static ThreadLocal<String> tenant = new ThreadLocal<>();

    public static void setTenantName(String tenantName) {
        tenant.set(tenantName);
    }

    public static String getTenantName() {
        return tenant.get();
    }

}
There are several ways to extract the tenant identifier from an incoming HTTP request (Header, Cookies, Access Token, ...). In this
example the client sends a HTTP Header with the name X-TenantID and the value is set to the tenant name. In Spring MVC we will then
implement a HandlerInterceptor to intercept an incoming request and extract data off of it.
The TenantNameInterceptor reads the X-TenantID header and stores its value to the ThreadLocalStorage.
// Licensed under the MIT license. See LICENSE file in the project root for full license information.

package de.bytefish.multitenancy.web.interceptors;

import de.bytefish.multitenancy.core.ThreadLocalStorage;
import org.springframework.web.servlet.HandlerInterceptor;

import jakarta.servlet.http.HttpServletRequest;
import jakarta.servlet.http.HttpServletResponse;
import org.springframework.web.servlet.ModelAndView;

public class TenantNameInterceptor implements HandlerInterceptor {

    @Override
    public boolean preHandle(HttpServletRequest request, HttpServletResponse response, Object handler) throws Exception {

        // Implement your logic to extract the Tenant Name here. Another way would be to
        // parse a JWT and extract the Tenant Name from the Claims in the Token. In the
        // example code we are just extracting a Header value:
        String tenantName = request.getHeader("X-TenantID");

        // Always set the Tenant Name, so we avoid leaking Tenants between Threads even in the scenario, when no
        // Tenant is given. I do this because if somehow the afterCompletion Handler isn't called the Tenant Name
        // could still be persisted within the ThreadLocal:
        ThreadLocalStorage.setTenantName(tenantName);

        return true;
    }

    @Override
    public void afterCompletion(HttpServletRequest request, HttpServletResponse response, Object handler, Exception ex) throws Exception {

        // After completing the request, make sure to erase the Tenant from the current Thread. It's
        // because Spring may reuse the Thread in the Thread Pool and you don't want to leak this
        // information:
        ThreadLocalStorage.setTenantName(null);
    }

}
To configure Spring MVC, we need to extend the WebMvcConfigurer and add the TenantNameInterceptor to the list of interceptors.
// Copyright (c) Philipp Wagner. All rights reserved.
// Licensed under the MIT license. See LICENSE file in the project root for full license information.

package de.bytefish.multitenancy.web.configuration;

import de.bytefish.multitenancy.web.interceptors.TenantNameInterceptor;
import org.springframework.context.annotation.Configuration;
import org.springframework.web.servlet.config.annotation.InterceptorRegistry;
import org.springframework.web.servlet.config.annotation.WebMvcConfigurer;

@Configuration
public class WebMvcConfig implements WebMvcConfigurer {

    @Override
    public void addInterceptors(InterceptorRegistry registry) {
        registry.addInterceptor(new TenantNameInterceptor());
    }

}
The tenant name is then used as the lookup key for determining the target DataSource, we add a file TenantAwareRoutingSource:
// Licensed under the MIT license. See LICENSE file in the project root for full license information.

package de.bytefish.multitenancy.datasource;

import de.bytefish.multitenancy.core.ThreadLocalStorage;
import org.springframework.jdbc.datasource.lookup.AbstractRoutingDataSource;

public class TenantAwareRoutingSource extends AbstractRoutingDataSource {

    @Override
    protected Object determineCurrentLookupKey() {
        return ThreadLocalStorage.getTenantName();
    }

}
Asynchronous Programming is a great way to build efficient services. We are working with a ThreadLocal
and if Spring Boot creates a new Runnable task, we need to also set the Tenant name in the new
Thread.
We can implement this by adding TaskDecorator:
// Licensed under the MIT license. See LICENSE file in the project root for full license information.

package de.bytefish.multitenancy.async;

import de.bytefish.multitenancy.core.ThreadLocalStorage;
import org.springframework.core.task.TaskDecorator;

public class TenantAwareTaskDecorator implements TaskDecorator {

    @Override
    public Runnable decorate(Runnable runnable) {
        String tenantName = ThreadLocalStorage.getTenantName();
        return () -> {
            try {
                ThreadLocalStorage.setTenantName(tenantName);
                runnable.run();
            } finally {
                ThreadLocalStorage.setTenantName(null);
            }
        };
    }
}
And configuring the ThreadPoolTaskExecutor to use our TenantAwareTaskDecorator:
// Licensed under the MIT license. See LICENSE file in the project root for full license information.

package de.bytefish.multitenancy.async;

import org.springframework.context.annotation.Configuration;
import org.springframework.scheduling.annotation.AsyncConfigurerSupport;
import org.springframework.scheduling.concurrent.ThreadPoolTaskExecutor;

import java.util.concurrent.Executor;

@Configuration
public class AsyncConfig extends AsyncConfigurerSupport {

    @Override
    public Executor getAsyncExecutor() {
        ThreadPoolTaskExecutor executor = new ThreadPoolTaskExecutor();

        executor.setCorePoolSize(7);
        executor.setMaxPoolSize(42);
        executor.setQueueCapacity(11);
        executor.setThreadNamePrefix("TenantAwareTaskExecutor-");
        executor.setTaskDecorator(new TenantAwareTaskDecorator());
        executor.initialize();

        return executor;
    }

}
Application Configuration and Tenants
Then we use the Spring Boot YAML Configuration and put it in the /resources folder, instead of using properties. The
application.yml has a application configuration section, which has the list of tenants with their connection
settings:
application:
  tenants:
    - name: "tenant_a"
      dbUrl: "jdbc:postgresql://localhost:5432/sampledb"
      dbUser: "tenant_a"
      dbPassword: "tenant_a"
    - name: "tenant_b"
      dbUrl: "jdbc:postgresql://localhost:5432/sampledb"
      dbUser: "tenant_b"
      dbPassword: "tenant_b"
We want it to be somewhat type-safe, so we map this to a ApplicationConfiguration class:
// Licensed under the MIT license. See LICENSE file in the project root for full license information.

package de.bytefish.multitenancy.conf;

import org.springframework.boot.context.properties.ConfigurationProperties;

import java.util.List;

@ConfigurationProperties(prefix = "application")
public class ApplicationConfiguration {

    private final List<TenantConfiguration> tenants;

    public ApplicationConfiguration(List<TenantConfiguration> tenants) {
        this.tenants = tenants;
    }

    public List<TenantConfiguration> getTenants() {
        return tenants;
    }
}
The TenantConfiguration then holds the Tenants name and the database connection settings:
// Licensed under the MIT license. See LICENSE file in the project root for full license information.

package de.bytefish.multitenancy.conf;

public class TenantConfiguration {

    private final String name;
    private final String dbUrl;
    private final String dbUser;
    private final String dbPassword;

    public TenantConfiguration(String name, String dbUrl, String dbUser, String dbPassword) {
        this.name = name;
        this.dbUrl = dbUrl;
        this.dbUser = dbUser;
        this.dbPassword = dbPassword;
    }

    public String getName() {
        return name;
    }

    public String getDbUrl() {
        return dbUrl;
    }

    public String getDbUser() {
        return dbUser;
    }

    public String getDbPassword() {
        return dbPassword;
    }
}
Now what's left is to populate the TenantAwareRoutingSource with a DataSource for each Tenant. So in the
SampleSpringApplication we use the ApplicationConfiguration to build the TenantAwareRoutingSource, which
is then used by JPA somewhere down the line.
@SpringBootApplication
@EnableAsync
@EnableTransactionManagement
@ConfigurationPropertiesScan
public class SampleSpringApplication {

    public static void main(String[] args) {
        SpringApplication.run(SampleSpringApplication.class, args);
    }

    @Bean
    public DataSource dataSource(ApplicationConfiguration applicationConfiguration) {

        AbstractRoutingDataSource dataSource = new TenantAwareRoutingSource();

        Map<Object,Object> targetDataSources = new HashMap<>();

        for(var tenantConfiguration : applicationConfiguration.getTenants()) {
            // Builds the DataSource for the Tenant
            var tenantDataSource = buildDataSource(tenantConfiguration);
            // Puts it into the DataSources available for routing a Request
            targetDataSources.put(tenantConfiguration.getName(), tenantDataSource);
        }

        dataSource.setTargetDataSources(targetDataSources);

        dataSource.afterPropertiesSet();

        return dataSource;
    }

    public DataSource buildDataSource(TenantConfiguration tenantConfiguration) {
        HikariDataSource dataSource = new HikariDataSource();

        dataSource.setInitializationFailTimeout(0);
        dataSource.setMaximumPoolSize(5);
        dataSource.setDataSourceClassName("org.postgresql.ds.PGSimpleDataSource");
        dataSource.addDataSourceProperty("url", tenantConfiguration.getDbUrl());
        dataSource.addDataSourceProperty("user", tenantConfiguration.getDbUser());
        dataSource.addDataSourceProperty("password", tenantConfiguration.getDbPassword());

        return dataSource;
    }
}
Domain Model, JPA CrudRepositories and Controllers
All Entities, that are bound to a specific tenant, derive from a common TenantAware interface:
// Licensed under the MIT license. See LICENSE file in the project root for full license information.

package de.bytefish.multitenancy.core;

import de.bytefish.multitenancy.model.Tenant;

public interface TenantAware {

    Tenant getTenant();

    void setTenant(Tenant tenant);
}
The Customer class then implements the TenantAware interface and maps to the customer database table. We also
annotates it with a TenantListener Entity Listener.
// Licensed under the MIT license. See LICENSE file in the project root for full license information.

package de.bytefish.multitenancy.model;

import de.bytefish.multitenancy.core.TenantAware;
import de.bytefish.multitenancy.core.TenantListener;

import jakarta.persistence.*;
import java.util.ArrayList;
import java.util.List;

@Entity
@Table(schema = "multitenant", name = "customer")
@EntityListeners(TenantListener.class)
public class Customer implements TenantAware {

    @Id
    @GeneratedValue(strategy = GenerationType.IDENTITY)
    @Column(name = "customer_id")
    private Long id;

    @Embedded
    private Tenant tenant;

    @Column(name = "first_name")
    private String firstName;

    @Column(name = "last_name")
    private String lastName;

    @OneToMany(mappedBy = "customer", fetch = FetchType.EAGER, cascade = CascadeType.ALL)
    List<CustomerAddress> addresses = new ArrayList<>();

    public Customer() {
    }

    public Long getId() {
        return id;
    }

    public void setId(Long id) {
        this.id = id;
    }

    public String getFirstName() {
        return firstName;
    }

    public void setFirstName(String firstName) {
        this.firstName = firstName;
    }

    public String getLastName() {
        return lastName;
    }

    public void setLastName(String lastName) {
        this.lastName = lastName;
    }

    public List<CustomerAddress> getAddresses() {
        return addresses;
    }

    public void setAddresses(List<CustomerAddress> addresses) {
        this.addresses = addresses;
    }

    @Override
    public Tenant getTenant() {
        return tenant;
    }

    @Override
    public void setTenant(Tenant tenant) {
        this.tenant = tenant;
    }
}
An EntityListener is somewhat the JPA equivalent to a Database Trigger, and can be configured to perform an action on insert,
update or delete. In our Multitenant Application, we need to set the Tenant for all entities, that are marked as TenantAware,
before inserting them:
// Licensed under the MIT license. See LICENSE file in the project root for full license information.

package de.bytefish.multitenancy.core;

import de.bytefish.multitenancy.model.Tenant;

import jakarta.persistence.PrePersist;
import jakarta.persistence.PreRemove;
import jakarta.persistence.PreUpdate;

public class TenantListener {

    @PreUpdate
    @PreRemove
    @PrePersist
    public void setTenant(TenantAware entity) {
        Tenant tenant = entity.getTenant();

        if(tenant == null) {
            tenant = new Tenant();

            entity.setTenant(tenant);
        }

        final String tenantName = ThreadLocalStorage.getTenantName();

        tenant.setTenantName(tenantName);
    }
}
Adding CRUD functionality then is simple with Spring Boot, which provides a so called CrudRepository. You
simply extend from the CrudRepository interface and Spring automatically provides all CRUD functionality
for your entity.
// Licensed under the MIT license. See LICENSE file in the project root for full license information.

package de.bytefish.multitenancy.repositories;

import de.bytefish.multitenancy.model.Customer;
import org.springframework.data.repository.CrudRepository;

public interface ICustomerRepository extends CrudRepository<Customer, Long> {
}
You should always separate your Web Layer from the Domain Layer. In an ideal world Web Layer should only care about receiving and sending Data Transfer Objects to the consumer. It should know how to convert between the Data Transfer Object and the Domain model, so it can use the Domain repositories.
The CustomerDto doesn't contain a tenant name property and it uses Jackson annotations to provide the JSON mapping.
// Copyright (c) Philipp Wagner. All rights reserved.
// Licensed under the MIT license. See LICENSE file in the project root for full license information.

package de.bytefish.multitenancy.web.model;

import com.fasterxml.jackson.annotation.JsonCreator;
import com.fasterxml.jackson.annotation.JsonProperty;

public class CustomerDto {

    private final Long id;

    private final String firstName;

    private final String lastName;

    @JsonCreator
    public CustomerDto(@JsonProperty("id") Long id, @JsonProperty("firstName") String firstName, @JsonProperty("lastName") String lastName) {
        this.id = id;
        this.firstName = firstName;
        this.lastName = lastName;
    }

    @JsonProperty("id")
    public Long getId() {
        return id;
    }

    @JsonProperty("firstName")
    public String getFirstName() {
        return firstName;
    }

    @JsonProperty("lastName")
    public String getLastName() {
        return lastName;
    }
}
The Converters class provides two methods to convert between the CustomerDto and the Customer model.
// Licensed under the MIT license. See LICENSE file in the project root for full license information.

package de.bytefish.multitenancy.web.converter;

import de.bytefish.multitenancy.model.Customer;
import de.bytefish.multitenancy.web.model.CustomerDto;

import java.util.List;
import java.util.stream.Collectors;
import java.util.stream.StreamSupport;

public class Converters {

    private Converters() {

    }

    public static CustomerDto convert(Customer source) {
        if(source == null) {
            return null;
        }

        return new CustomerDto(source.getId(), source.getFirstName(), source.getLastName());
    }

    public static Customer convert(CustomerDto source, String tenantName) {
        if(source == null) {
            return null;
        }

        return new Customer(source.getId(), source.getFirstName(), source.getLastName(), tenantName);
    }

    public static List<CustomerDto> convert(Iterable<Customer> customers) {
        return StreamSupport.stream(customers.spliterator(), false)
                .map(Converters::convert)
                .collect(Collectors.toList());
    }
}
Implementing the RESTful Webservice with Spring MVC requires us to implement a RestController. We are using the
ICustomerRepository for querying the database and using the Converters to convert between the Model classes and
DTO classes.
// Copyright (c) Philipp Wagner. All rights reserved.
// Licensed under the MIT license. See LICENSE file in the project root for full license information.

package de.bytefish.multitenancy.web.controllers;

import de.bytefish.multitenancy.core.ThreadLocalStorage;
import de.bytefish.multitenancy.model.Customer;
import de.bytefish.multitenancy.repositories.ICustomerRepository;
import de.bytefish.multitenancy.web.converter.Converters;
import de.bytefish.multitenancy.web.model.CustomerDto;
import org.springframework.beans.factory.annotation.Autowired;
import org.springframework.web.bind.annotation.*;

import java.util.List;
import java.util.concurrent.CompletableFuture;
import java.util.concurrent.ExecutionException;
import java.util.stream.Collectors;
import java.util.stream.StreamSupport;

@RestController
public class CustomerController {

    private final ICustomerRepository repository;

    @Autowired
    public CustomerController(ICustomerRepository repository) {
        this.repository = repository;
    }

    @GetMapping("/customers")
    public List<CustomerDto> getAll() {
        Iterable<Customer> customers = repository.findAll();

        return Converters.convert(customers);
    }

    @GetMapping("/customers/{id}")
    public CustomerDto get(@PathVariable("id") long id) {
        Customer customer = repository
                .findById(id)
                .orElse(null);

        return Converters.convert(customer);
    }

    @GetMapping("/async/customers")
    public List<CustomerDto> getAllAsync() throws ExecutionException, InterruptedException {
        return repository.findAllAsync()
                .thenApply(x -> Converters.convert(x))
                .get();
    }

    @PostMapping("/customers")
    public CustomerDto post(@RequestBody CustomerDto customer) {
        // Get the current Tenant:
        String tenantName = ThreadLocalStorage.getTenantName();

        // Convert to the Domain Object:
        Customer source = Converters.convert(customer, tenantName);

        // Store the Entity:
        Customer result = repository.save(source);

        // Return the DTO:
        return Converters.convert(result);
    }

    @DeleteMapping("/customers/{id}")
    public void delete(@PathVariable("id") long id) {
        repository.deleteById(id);
    }

}
Creating a Dockerfile for the Spring Boot Application
We create a Dockerfile in the folder /docker/rls-api, which uses the maven image,
so we have everything we need for our Spring Boot Application. In the Dockerfile we
instruct it to copy the pom.xml and the entire src folder.
FROM maven:3.8.5-openjdk-17

WORKDIR /rls-api

COPY pom.xml pom.xml
COPY src src

RUN mvn clean install

CMD mvn spring-boot:run
Finally we add a rls-api service to our docker-compose.yaml, that lives in the root folder. It
uses the SPRING_PROFILES_ACTIVE variable, so the correct application.yml is resolved. It depends
on the postgres database to be healthy.
networks:
  services:

services:
  postgres:
    image: postgres:16
    container_name: postgres
    networks:
      - services
    ports:
      - "5432:5432"
    environment:
      - POSTGRES_USER=postgres
      - POSTGRES_PASSWORD=password
      - POSTGRES_DB=sampledb
    volumes:
      - ./sql/create_database.sql:/docker-entrypoint-initdb.d/1-create_database.sql
      - ./sql/create_data.sql:/docker-entrypoint-initdb.d/2-create_data.sql
    healthcheck:
      test: [ "CMD-SHELL", "pg_isready -U postgres" ]
      interval: 5s
      timeout: 5s
      retries: 5
    profiles:  ["postgres", "dev"]
  rls-api:
    depends_on:
      - postgres
    build:
      context: .
      dockerfile: ./docker/rls-api/Dockerfile
    networks:
      - services
    restart: on-failure
    env_file: ./docker/.env
    profiles:  ["api", "dev"]
    ports:
      - "8080:8080"
    environment:
      - SPRING_PROFILES_ACTIVE=docker
    volumes:
      - /docker/.m2:/root/.m2
    stdin_open: true
    tty: true
Spring Boot Configuration
If we are starting our application it will throw lots of Exceptions at us. Why? Because Spring Boots autoconfiguration for JDBC tries to resolve the database dialect from the actual database.
This is a problem, because there is no such thing as a "default tenant". So we are using some more or less obscure Hibernate configuration properties I found after lots of debugging the Hibernate source code.
The full application.yml for Docker now looks like this:
spring:
  config:
    activate:
      on-profile: docker
  jpa:
    properties:
      hibernate.temp.use_jdbc_metadata_defaults: false
    database: postgresql
    database-platform: org.hibernate.dialect.PostgreSQLDialect
    open-in-view: false
    datasource:
      initialize: false
    hibernate:
      ddl-auto: none
      dialect:
        format_sql: true
      naming:
        physical-strategy: org.hibernate.boot.model.naming.PhysicalNamingStrategyStandardImpl

application:
  tenants:
    - name: "tenant_a"
      dbUrl: "jdbc:postgresql://postgres:5432/sampledb"
      dbUser: "tenant_a"
      dbPassword: "tenant_a"
    - name: "tenant_b"
      dbUrl: "jdbc:postgresql://postgres:5432/sampledb"
      dbUser: "tenant_b"
      dbPassword: "tenant_b"
Testing the Application
You can use Docker Compose to create the PostgreSQL database and start the Spring Boot application:
docker compose --profile dev up
The Postgres Database currently has a customer for each Tenant:
> select * from multitenant.customer

 customer_id    |  first_name   |   last_name   |   tenant_name
----------------+---------------+---------------+--------------
    1           |   Philipp     |   Wagner      |   tenant_a
    2           |   John        |   Wick        |   tenant_b
(2 rows)
The list of customers for tenant_a only contains "Philipp Wagner", as expected:
> curl -H "X-TenantID: tenant_a" -X GET http://localhost:8080/customers

[{"id":1,"firstName":"Philipp","lastName":"Wagner","addresses":[{"id":1,"name":"Philipp Wagner","street":"Fakestreet 1","postalcode":"12345","city":"Faketown","country":"Germany"}]}]
And the list of customers for tenant_b only contains "John Wick", again as expected:
>curl -H "X-TenantID: tenant_b" -X GET http://localhost:8080/customers

[{"id":2,"firstName":"John","lastName":"Wick","addresses":[{"id":2,"name":"John Wick","street":"Fakestreet 55","postalcode":"00000","city":"Fakecity","country":"USA"}]}]
We now insert a new customer for Tenant tenant_a:
> curl -H "X-TenantID: tenant_a" -H "Content-Type: application/json" -X POST -d "{\"firstName\" : \"Max\", \"lastName\" : \"Mustermann\"}"  http://localhost:8080/customers

{"id":38187,"firstName":"Max","lastName":"Mustermann","addresses":[]}
Getting a list of all customers for tenant_a will now return two customers:
> curl -H "X-TenantID: tenant_a" -X GET http://localhost:8080/customers

[{"id":1,"firstName":"Philipp","lastName":"Wagner"},{"id":38187,"firstName":"Max","lastName":"Mustermann"}]
While requesting a list of all customers for tenant_b returns John Wick only:
> curl -H "X-TenantID:  tenant_b" -X GET http://localhost:8080/customers

[{"id":2,"firstName":"John","lastName":"Wick"}]
We can now insert a customer for tenant_b:
> curl -H "X-TenantID: tenant_b" -H "Content-Type: application/json" -X POST -d "{\"firstName\" : \"Hans\", \"lastName\" : \"Wurst\"}"  http://localhost:8080/customers

{"id":38188,"firstName":"Hans","lastName":"Wurst","addresses":[]}
Querying the tenant_a database still returns "Philipp Wagner" and "Max Mustermann":
> curl -H "X-TenantID: tenant_a" -X GET http://localhost:8080/customers

[{"id":1,"firstName":"Philipp","lastName":"Wagner"},{"id":38187,"firstName":"Max","lastName":"Mustermann"}]
While querying as tenant_b now returns "John Wick" and "Hans Wurst":
> curl -H "X-TenantID: tenant_b" -X GET http://localhost:8080/customers

[{"id":2,"firstName":"John","lastName":"Wick"},{"id":38188,"firstName":"Hans","lastName":"Wurst"}]
Conclusion
And that's it! I think it's really easy to provide multitenancy with Spring Boot and Postgres Row Level Security.
If you have troubles with the project, feel free to open an issue in the GitHub repository.