I've got a lot of mails from people, who have problems to use OpenCV with Microsoft Visual Studio 2008/2010. While I think it's unbelievably easy by using CMake, I am going to explain how to build the libfacerec demo without using CMake. I have illustrated each step with screenshots and detailed explanation, so it's easy for you to follow.
I am going to use Microsoft Windows 7, Microsoft Visual Studio 2010 and OpenCV 2.3.1 in this tutorial.
Setting up OpenCV
First of all you'll need OpenCV. For this tutorial I suggest to download the OpenCV Superpack 2.3.1, which is available as OpenCV-2.3.1-win-superpack.exe at:
There are a lot of other ways to install OpenCV, so please consult the docs if you don't like the suggested one. The Superpack itself is not an installer, but a self-extracting archive. It contains the pre-built OpenCV library for VC9 (Microsoft Visual Studio 2008), VC10 (Microsoft Visual Studio 2010) and MinGW to mention a few. You'll only need the VC10 binaries for this tutorial.
Double-click the OpenCV-2.3.1-win-superpack.exe and select a folder to extract to. I'll choose D:\projects in this example:
The OpenCV superpack is no installer, so you'll need to manually add the OpenCV libraries to the DLL search path of Windows. The search paths of Windows are given in the PATH environment variable, which is a list of the directories to search, each separated by a semicolon.
Windows Vista and Windows 7 users
- From the Desktop (or Start Menu), right-click My Computer and click Properties.
- Click Advanced System Settings link in the left column.
- In the System Properties window click the Environment Variables button.
- In the Environment Variables window, highlight the Path variable in the Systems Variable section and click the Edit button. In the PATH variable each search path is separated with a semicolon.
- At the end of the line add the following directories:
- D:\projects\opencv\build\x86\vc10\bin
- D:\projects\opencv\build\common\tbb\ia32\vc10
So you have to append a line like this to the existing PATH:
;D:\projects\opencv\build\x86\vc10\bin;D:\projects\opencv\build\common\tbb\ia32\vc10
Windows 2000 and Windows XP users
- From the Desktop, right-click My Computer and click Properties.
- In the System Properties window, click on the Advanced tab.
- In the Advanced section, click the Environment Variables button.
- In the Environment Variables window, highlight the Path variable in the Systems Variable section and click the Edit button. In the PATH variable each search path is separated with a semicolon.
- At the end of the line add the following directories:
- D:\projects\opencv\build\x86\vc10\bin
- D:\projects\opencv\build\common\tbb\ia32\vc10
So you have to append a line like this to the existing PATH:
;D:\projects\opencv\build\x86\vc10\bin;D:\projects\opencv\build\common\tbb\ia32\vc10
Getting libfacerec
Next you'll need to download libfacerec, which is available from:
If you don't know how to clone a github repository with git, then you can download the source from:
Then extract the zip or tar.gz file to a folder of your choice, I am using D:\downloads\libfacerec in this tutorial. If you are using an other folder, then just keep it consistent.
Setting up Visual Studio
You'll now learn how to configure a Microsoft Visual Studio 10 C++ project with OpenCV. Parts might resemble the post by karlphilipp, which also explains how to configure OpenCV 2.3 on Visual Studio 2010. I won't reinvent the wheel, so you probably want to read hist post at:
The difference is, that I've decided to use pre-built Visual Studio 2010 (VC 10) libraries from the superpack.
And I mention some pitfalls I have encountered when compiling libfacerec.
Create an Empty project
Start Visual Studio and from the main menu select "File -> New Project...".
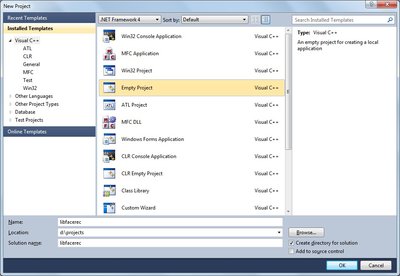
Then create an "Empty Project", name it libfacerec and store it in D:\projects:
Adding the libfacerec headers and sources
First of all the libfacerec headers and sources are added to our solution. For this copy the libfacerec header files from your extracted archive in D:\downloads\libfacerec\include to where
your the solution is located in D:\projects\libfacerec\libfacerec. Also copy the source files from D:\downloads\libfacerec\src to D:\projects\libfacerec\libfacerec.
Now add the files to the Microsoft Visual Studio solution. In the Solution Explorer right click on Header Files and select Add -> Existing Item...", then select all .hpp files you've just copied. Do the same for the source files and right click on Source Files and select all .cpp files.
Your project now looks like this:
Additional Include Directories
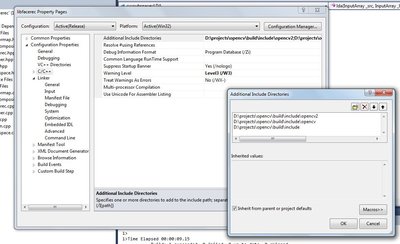
Your project doesn't compile yet, because we didn't configure OpenCV. The first step is to set the additional include directories for our project. Go to the Project Properties by either right click on your project and select Properties or by pressing Alt + F7, in the new window do the following:
- From the
Configurationbox (combo box in the top left), selectAll Configurations - Open
Configuration Properties -> C/C++ -> Generaland edit the fieldAdditional Include Directoriesto add these 3 include paths:- D:\projects\opencv\build\include
- D:\projects\opencv\build\include\opencv
- D:\projects\opencv\build\include\opencv2
Additional Library Directories and Additional Dependencies
Then we need to add the libraries to build against. Again in the Project Properties Window do the following:
- Add the path of the OpenCV libraries by
Configuration Properties -> Linker -> Generaland on theAdditional Library Directoriesfield add:- D:\projects\opencv\build\x86\vc10\lib
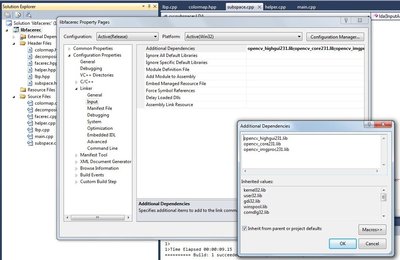
Then go to Configuration Properties -> Linker -> Input and in the Additional Dependencies field add:
opencv_highgui231.libopencv_core231.libopencv_imgproc231.lib
Build libfacerec
Finally libfacerec can be built. We are linking against the libraries:
opencv_core231.libopencv_highgui231.libopencv_imgproc231.lib
Those libraries have no Debug symbols, so we build libfacerec with the Release Configuration:
Then build the project and its executable by simply selecting Build -> Build Solution (or F7) from the Menu. And you should see:
Congratulations!
Running the Demo
In the demo I have decided to read images from a very simple CSV file. Why? Because it's the simplest platform-independent approach I can think of. However, if you know a simpler solution please
ping me about it. Basically all the CSV file needs to contain are lines composed of a filename followed by a ; followed by the label (as integer number), making up a line like this:
/path/to/image.ext;0
Think of the label as the subject (the person) this image belongs to, so same subjects (persons) should have the same label. So let's make up an example.
Download the AT&T Facedatabase from AT&T Facedatabase and the corresponding CSV file from
at.txt, which looks like this (file is without ... of course):
./at/s1/1.pgm;0
./at/s1/2.pgm;0
...
./at/s2/1.pgm;1
./at/s2/2.pgm;1
...
./at/s40/1.pgm;39
./at/s40/2.pgm;39
Imagine I have extracted the files to D:/data/at and have downloaded the CSV file to D:/data/at.txt. Then I would simply Search & Replace ./ with D:/data/. You can
do that in an editor of your choice, every sufficiently advanced editor can do this. Once you have a CSV file with valid filenames and labels,
you can run the demo by with the path to the CSV file as parameter:
D:\projects\libfacerec\Release\libfacerec.exe D:/data/at.txt
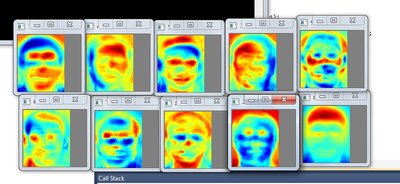
And you should see:
Conclusion
So I can finally answer the question of the mails I got: Yes, I am pretty sure all this also works with Microsoft Visual Studio.


